I am preparing for the exam AZ-100 on the Microsoft Certified Azure Administrator Associate track. The below are my study notes on Resource Groups.
These are intended as post study revision notes, you will probably need more than these to pass the exam, But hopefully they will help you out.
What is a Resource Group?

A Resource Group allows you to logically group related resources. Think Active Directory Organisational Unit. Resource Groups allow you to manage the group members as a single item.
They have some cool features which will come on to later including locks, access control, policies, tags, alerts and metrics.
Creating a Resource Group
When creating a resource group you can use any of the below methods. There are two required settings, a name and a location. The locations is where the resource group will be created but the resources in the group do not need to be in this location. As well as these methods you can generally create a new resource group at the same time as you creating other resources.
Using the Portal
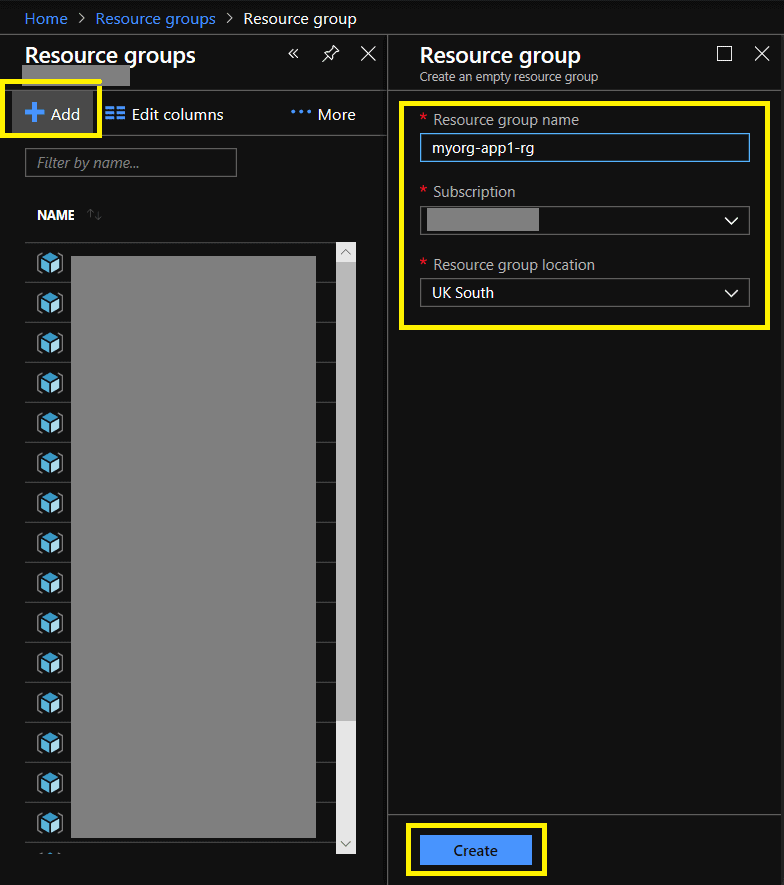
Either click “Create a resource” search for “Resource Group” and press Create. Or navigation to “Resource Groups” and click “Add”
Give the resource group a name and a location. If you have more than one subscription you may need to change the subscription. Click Create
Using PowerShell
I like to use the “Cloud Shell” from the Azure portal to get connected. On the portal click the “Cloud Shell” icon at the top. If this is your first time connecting you will need to select PowerShell and let Azure create a storage account.
New-AzureRmResourceGroup -name 'myorg-app1-rg' -Location 'UK South'
You cab use tab completion to help you out, for example after -Location you can double tap the TAB key to get a list of the supported locations.

Using the AzureCLI
From the Portal select the “Cloud Shell” icon at the top. Again is this is your first time connecting using the CloudShell you will need to select PowerShell and let Azure create a storage account.
az group create --name myorg-app1-rg --location "UK South"
Resource Group Tags
Tags are a further method of logically grouping resources and resource groups. For example for can give resources in different resource groups the same tag to help with billing and general management.
Tags consist of a name and a value.
Tag Rules;
- Tags are not inherited, i.e a tag applied to a resource group does not filter down to the groups members.
- Names can’t contain special characters <,>,%,&,\,?,/
- You can have up to 15 tags
- The tag name is limited to 512 characters
- The tag value is limited to 256 characters
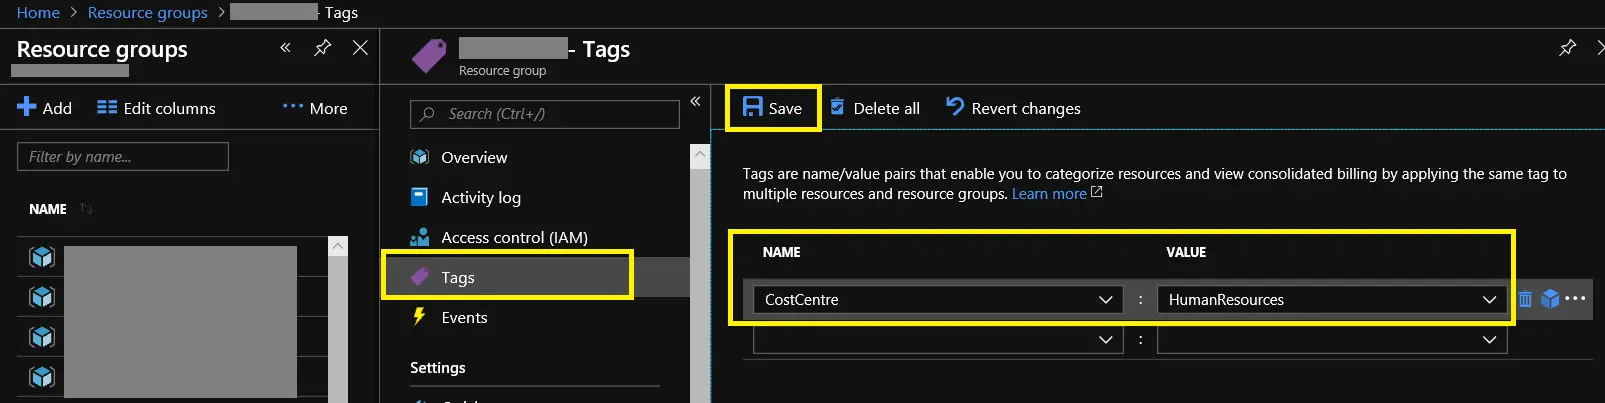
Viewing and adding Tags via the portal
Navigate to the resource group select Tags and enter the required name and value.
Using PowerShell to list a Resource Groups Tags
(Get-AzureRmResourceGroup -name 'myorg-app1-rg').Tags
Using PowerShell to add a Tag to a resource group
When you add an additional tag using PowerShell you actually replace all of the current tags with your new tag. Instead of jumping straight into using the Set-AzureRmResourceGroup -Tag command we generally want store the our current tags in a variable and append our new tag. That way we can preserve all of the current tags.
#Store the current tags in the variable tags
$tags = (Get-AzureRmResourceGroup -name 'myorg-app1-rg').Tags

#Append our new tag to the tags variable. Our new tag has the name CostCentre and the value HumanResources
$tags.Add("CostCentre", "HumanResources")

#Set the resources groups tags to equal the contents of our tags varible
Set-AzureRmResourceGroup -Tag $tags -Name 'myorg-app1-rg'
Using AzureCLI to list a Resource Groups Tags
az group show -n myorg-app1-rg --query tags
Using AzureCLI to add a Resource Groups Tag
az group update -n myorg-app1-rg --set tags.CostCentre=HumanResources
Resource Group Locks
Resource group locks are used to prevent accidental deletion or changes to resources in resource groups. There are two types of locks CanNotDelete and ReadOnly. Locks on a resource group will inherit down to the resource within the group.
For example, if you apply the CanNotDelete lock to a resource group you cannot delete any resources within that group without first removing the lock
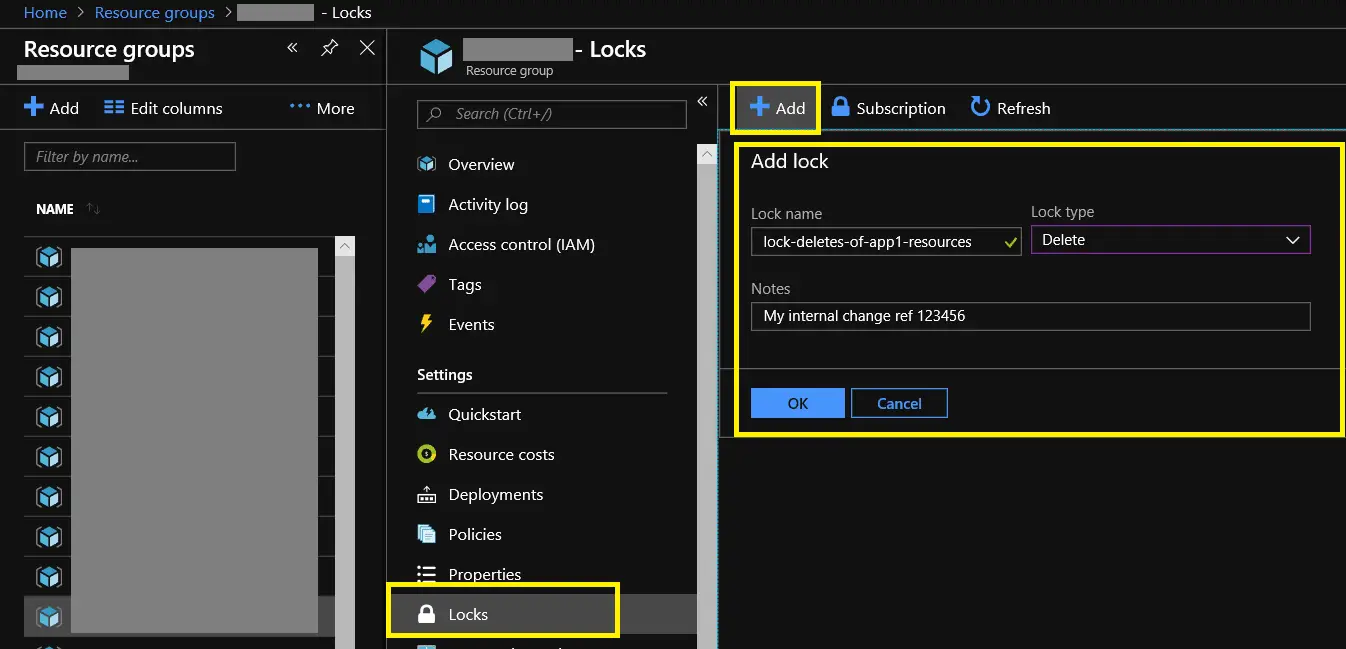
Adding and removing a Lock via the portal
Navigate to the resource group select Locks and enter the required details.
- Lock name – a descriptive name you you,
- Lock type – either by Read-only or Delete.
- Notes – an optional area to add addition details above the lock, an internal reference number maybe
If you need to delete or change a resource at a later date and the lock prevents you you will need to come back into the locks section and delete the lock.
Using PowerShell to list the Locks in place on a resource group
Get-AzureRmResourceLocak -ResourceGroupName myorg-app1-rg
Using PowerShell to add a Lock
New-AzureRm-ResourceLock -LockName lock-deletes-of-app1-resources -LockLevel CanNotDelete -ResourceGroupName myorg-app1-rg
Using PowerShell to remove a Lock
#Store the id of the lock in a variable
$lockID = (Get-AzureRmResourceLocak -ResourceGroupName myorg-app1-rg).LockId

#Remove the Lock
Remove-AzureRmResourceLock -LockId $lockID
Using AzureCLI to add a Lock
az lock create --name lock-deletes-of-app1-resources --lock-type CanNotDelete --resource-gorup myorg-app1-rg
Resource Group Access Control (IAM)
Access Control or identity and access management (IAM) provides fine grain access to resources. There are lots of pre-defined roles setup two important ones are Owner and Contributor, the difference being Owner’s can assign and change permissions and Contributor cannot.
Using the portal to add a role assignment (granting permissions)
- Navigate to the resource group and select “Access Control (IAM)
- Click “Add role assignment”
- Select the role and user and select Save
Using PowerShell to list the resource groups current role assignments
Get-AzureRmRoleAssignment -ResourceGroupName myorg-app1-rg
Using PowerShell to assign a role to a user
New-AzureRmRoleAssignment -SignInName [email protected] -RoleDefinitionName "Reader" -ResourceGroupName myorg-app1-rg
Using AzureCLI to list the resource groups current role assignments
az role assignment list -resource-group myorg-app1-rg
Using AzureCLI to assign a role to a user
az role assignment create --role Reader --assignee [email protected] -resource-group myorg-app1-rg
Resource Group Polices
Resource group polices allow you to apply definitions to the groups members to ensure compliance. For example you could create a policy to ensure that only virtual machines with the sizes/sku’s DS2v2 and DS3v2 can be created in the resource good. Or you could create a policy to audit the virtual machines that don’t have disaster recovery enabled.