I from time to time like many have needed to customize an MSI installer to preset certain properties, normally so I can perform a silent install with some sort of software deployment tool such as SCCM, Intune, or even via an Active Directory Group Policy. In this guide, I will cover the basics of using Microsoft free MSI editor Orca.
Table of Contents
- Overview
- Installing and Running Orca
- Creating a new MST File
- MSI Table Overview
- Adding and Removing Features
- Changing the default Answer to Prompts
- Saving the Transform File (MST)
- Making Further Changes to the MST File in Future
- Running and MSI with a Transform file
Overview
An MSI loosely follows a relational database structure holding all of the installation parameters and settings including.
- Available features
- Components
- Relationship between features and components
- Necessary registry settings
- User interface for the application
This mini-guide will introduce how to customize an MSI installer to pre-answer prompts during an installation and create a transform file MST (transforms file). In this example, we will be customizing the IBM Lotus Notes 7.0.3 install to not install the feature “Client Single Logon” and to change the install directory and data directory. But the same principles will apply to other MSI’s.
It is best practice to create an MST file to hold configuration changes rather than changing the original MSI. An MST file acts as an extension to an MSI file, so the original MSI file never gets changed and you can have several MST files with different settings for different purposes.
You can obviously buy software that will give you a nice easy GUI for making these changes however Microsoft has released a free tool as part of the Windows Installer SDK called Orca which allows you to go in and change data in the MSI database or create a separate transforms MST file.
Installing and Running Orca
- To install and run the Orca editor, follow these steps:
- Download the Windows Installer SDK samples, tools, and documentation from the following Web page: https://developer.microsoft.com/en-gb/windows/downloads/windows-10-sdk/
- Install the Orca editor by double-clicking the Orca.msi file in the \Microsoft SDK\bin folder.
- Click Start, point to Programs, and then click Orca.
- On the File menu, click Open, and then browse to the .msi file that you want to edit.
Creating a new MST File
Once you have opened the MSI with Orca you should create a new MST so any changes you make will be stored separately to the MSI (best practice)
- Got the Transform menu
- Select New Transform
If you need to you can now go into the Transform menu and change the Transform Properties for things such as “Product version lower”
MSI Table Overview
The main tables of interest are probably;
Feature: What features to install
Control: Holds everything to do with the installer’s interface
Property: Answers to prompts within the installer
Registry: Any changes to the registry
Shortcut: Any shortcuts created by the Application
Adding and Removing Features
Before going into the feature table we need to go into the property table and make a note of the value for the property INSTALLLEVEL, in my case it is 100 (normally the standard)

Now if we go into the feature table you should see there is a Level column, all features will a level value below or equal to INSTALLLEVEL will be set to install by default and all features will a value above will not be installed by default.
So if you want to change the feature to be installed change the Level value to one equal or lover than INSTALLLEVEL or set it higher to prevent it from being installed.
So using my example with Lotus Notes I am going to change the Level of the ClientSingleLogon feature from 101 to 1 so it does not get installed
Some things to watch out for here, items in the condition table can override these settings if the listed condition is met then the Level is set to the one listed. An MSI author can define install level values that represent specific installation options, such as Custom, Typical, or Minimum
Changing the default Answer to Prompts
When setting the default value for a prompt we need to look at two tables, the Control table, and the Property table.
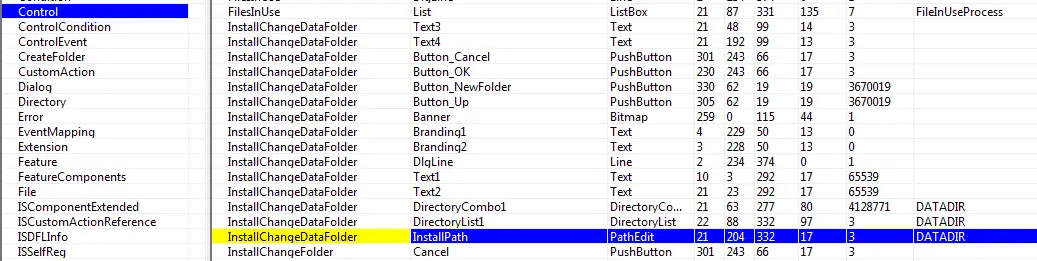
If you open the Control table first, we are interested in the columns Dialog, Control, and Property.

The Dialog column shows us the internal name of the current window during the install wizard, so this will give us a clue if we are in the right place
The Control column again will give us a clue we have found the correct control
The Property column is the really important one, you should notice that some controls have a property set and some do not. When the installer runs it will set the default value of the control to whatever is set for that property in the Property table
For example, in my Lotus Notes MSI’s Control table I have a control called InstallPath with the Property value of DATADIR
If I look in the Property table I can see a record for DATADIR with a value of “C:\program files\lotus\notes\data”
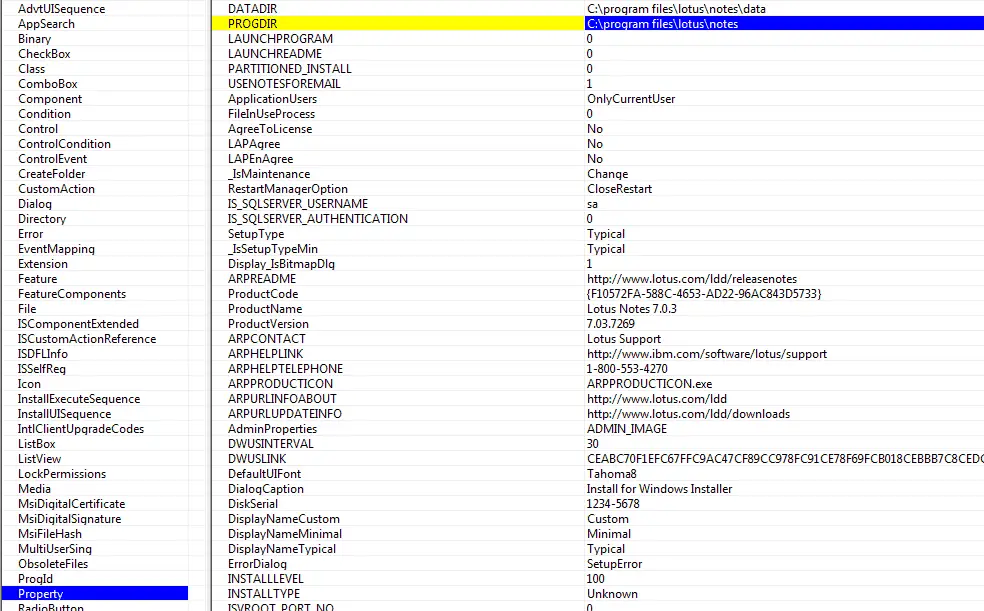
So if I want to change the Lotus Notes data directory I just need to edit DATADIR in the Property table.
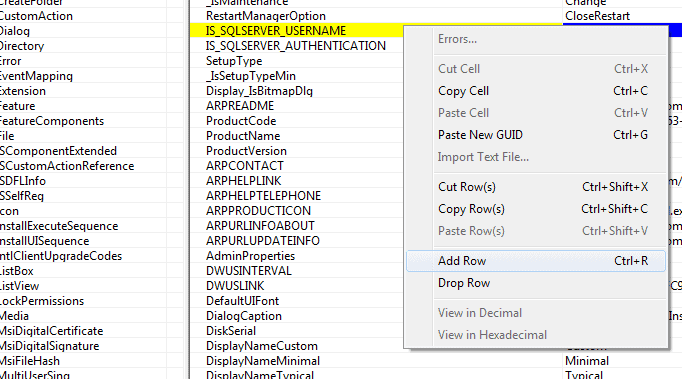
Sometimes you will find that a corresponding record does not exist in the Property table, if that happens you can just right-click in the table a select Add Row.
Note on Radio Buttons. If the control you want to set is a Radio Button then the value you need to enter in the Property table can be found in the RadioButton table in the Value column.
Saving the Transform File (MST)
Once you have made your changes it is time to save.
- Open the Transform menu
- Select Generate Transform
- Select were to save the MST file
Making Further Changes to the MST File in Future
- Open the MSI file with Orca
- Go to the Transform Menu
- Select Apply Transform
- Find and open your transform
- Orca will highlight change to the original MSI
Running and MSI with a Transform file
Msiexec /i “<MSI path and file>” TRANSFORMS=”<MST path and file>”
More detailed information on the MSI Database
http://msdn.microsoft.com/en-us/library/cc185688%28v=VS.85%29.aspx
As always please comment if you need some assistance.

Hi,
Thanks for this information. I have come across an MSI that doesn’t have the installlevel option. How do I then move forward ? Do I create that property and give it a value? eg: I want to install MS smallbasic and only want to install English language ( which is selectable if you go through the full UI install. But I want this to be a silent install with English selected. the MSI for smallbasic deosn’t have Installlevel as a property entry.
Hope you can expand this in a newer version of your post.
Thanks
Hi Geeks
I’ve had a go at modifying an msi using Orca to create an mst file but I’m not a programmer and I’m finding the fields a bit confusing. I want to install sqlncli.msi 2012 silently using GPO installation and as yet, I cant get it to work. The msi runs fine manually. If anyone could tell me which fields need editing and what too, it would be much appreciated. Thanks
this is a great article and has helped me a lot!
one comment however, I g got a little confused with the following:
“…So if you want to change feature to be installed change the Level value to one equal or lover than INSTALLLEVEL or set it higher prevent it from being installed.”
BUT:
“So using my example with Lotus Notes I am going to change the Level of the ClientSingleLogon feature from 101 to 1 so it does not get installed”
“1” is lower than the install Level. wouldn’t it be installed by default then?
I thought “101” would prevent it from being installed by default
My software requires a user name and password, will it be a generic naming convention from Orca?
what if I do not have InstallLevel? My MSI has the option to install java component if I don´t have the installlevel what does it means? how do I know if deploying the pack via GPO will install those components (the value is 1 y the feature table) by default, but when you open manually the msi the two check boxes are blank by default
He made a mistake there. Install level doesnt have to be specified in the properties. Check features and the install level there. If its not specified then its probably 1 and you can disable features by changing the ones you dont want to be installed to Install level 0.
Hi Geeks,
What is the the property and value for silent installation?
I’m looking for it too. Thanks a lot.