After some trial and error, I have successfully got the Meraki Dashboard to authenticate admin logins against Azure AD. The below is the steps I used, hopefully, they will be of use to others.
Table of Contents
- Creating the Azure Application
- Meraki SSO Configuration
- Completing Azure application’s Basic SAML Configuration section
- Creating a Meraki Role
- Completing Azure application’s attributes and claims section
- Giving access to use the application
- Testing
- Troubleshooting
- Notes
Creating the Azure Application
- Sign into your Azure Portal and navigate to your Azure Active Directory tenant.
- On the left select Enterprise applications and select New Application
- Select Non-gallery application
- Give the application a display name such as Meraki Dashboard and click Add
- Within your new application navigate to Manage => Single sign-on and select SAML as the sign-on method
Meraki SSO Configuration
- We will need two bits of information to configure the Meraki side. Still on the Manage => Single sign-on section on the Azure AD application;
- Take a copy of the Thumbprint under the SAML Signing Certificate section.
- Take a copy of the Logout URL under the Set up Meraki Dashboard section
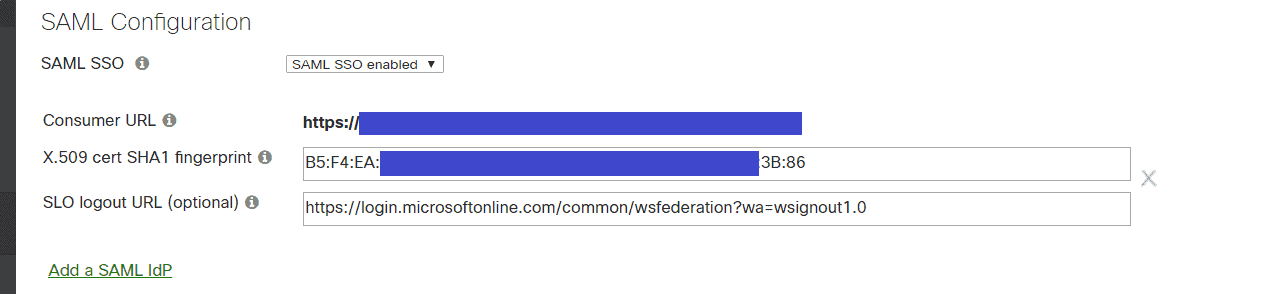
- Login to you Meraki dashboard and navigation to Organisation => Configuration => Settings
- Under SAML Configuration section set the SAML SSO drop down to SAML SSO Enabled
- Paste the previous Azure thumbprint into the fingerprint field and add colons to separate it into a hex sting. i.e if it was B5F3A2 it would change to B5:F3:A2
- Paste the previous Azure logout url into the “SLO logout URL” field
- Click Save
- After clicking save your “Consumer URL” will be visible. Take a copy of it, we will need it in a second.
Completing Azure application’s Basic SAML Configuration section
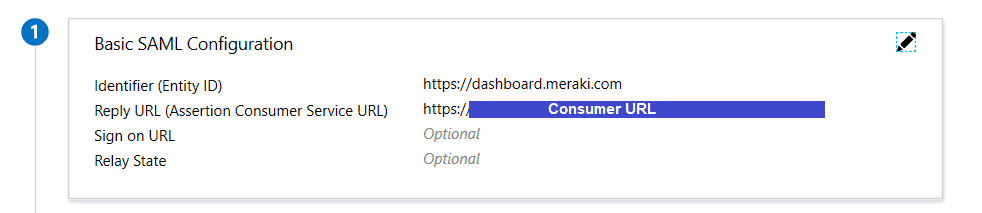
- Click the pen icon to edit the “Basic SAML Configuration” section.
- Identifier (Entity ID): https://dashboard.meraki.com
- Reply URL: Your “Consumer URL” from the previous section
- Click Save
Creating a Meraki Role
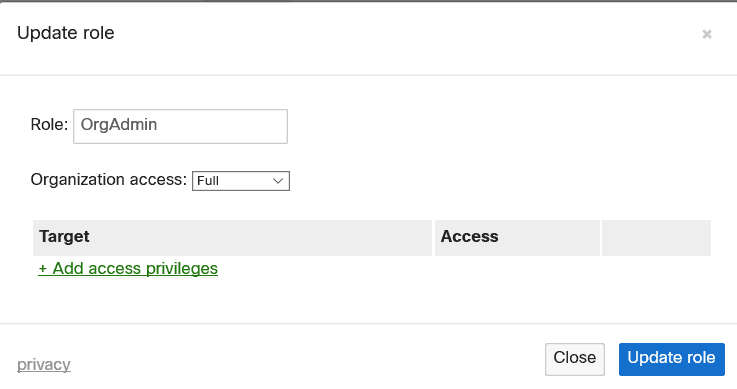
- Back on the Meraki portal navigate to Organisation => Configuration => Administrators
- Click Add SAML role
- Pick a name – We will need this later
- Assign the desired permissions and save the configuration.
Completing Azure application’s attributes and claims section
- Back within the Signal Sign-on section of our Enterprise application we need to complete the “User Attributes & Claims” section. Click the pen icon to edit the setup.
- Delete all the current rows, there will be one you can’t delete but don’t worry about that.
- Click Add new claim
- Name: username
- Namespace: https://dashboard.meraki.com/saml/attributes
- Source: Attribute
- Source Attribute: user.mail
- Click Save
- Click Add a new claim
- Name: role
- Namespace: https://dashboard.meraki.com/saml/attributes
- Source: Attribute
- Source Attribute: The name of the role you created on the Meraki portal
- Note: I had some issues putting free text into the source attribute field at first. Typing the name and then pressing the TAB key seemed to work for me.
- Click Save
- Still within the attributes and claims section click the pen icon to the right of “Name identifier value:” at the top and change the Source Attribute to user.mail

Giving access to use the application
- Within the application navigate to the Manage => Users & groups section
- Click the Add user and add the required administrator, maybe just start with yourself.
Testing
- Back within the Manage => Single Sigon-on section press the Test button at the very bottom.
- Press the Sign in as current user button.
Troubleshooting
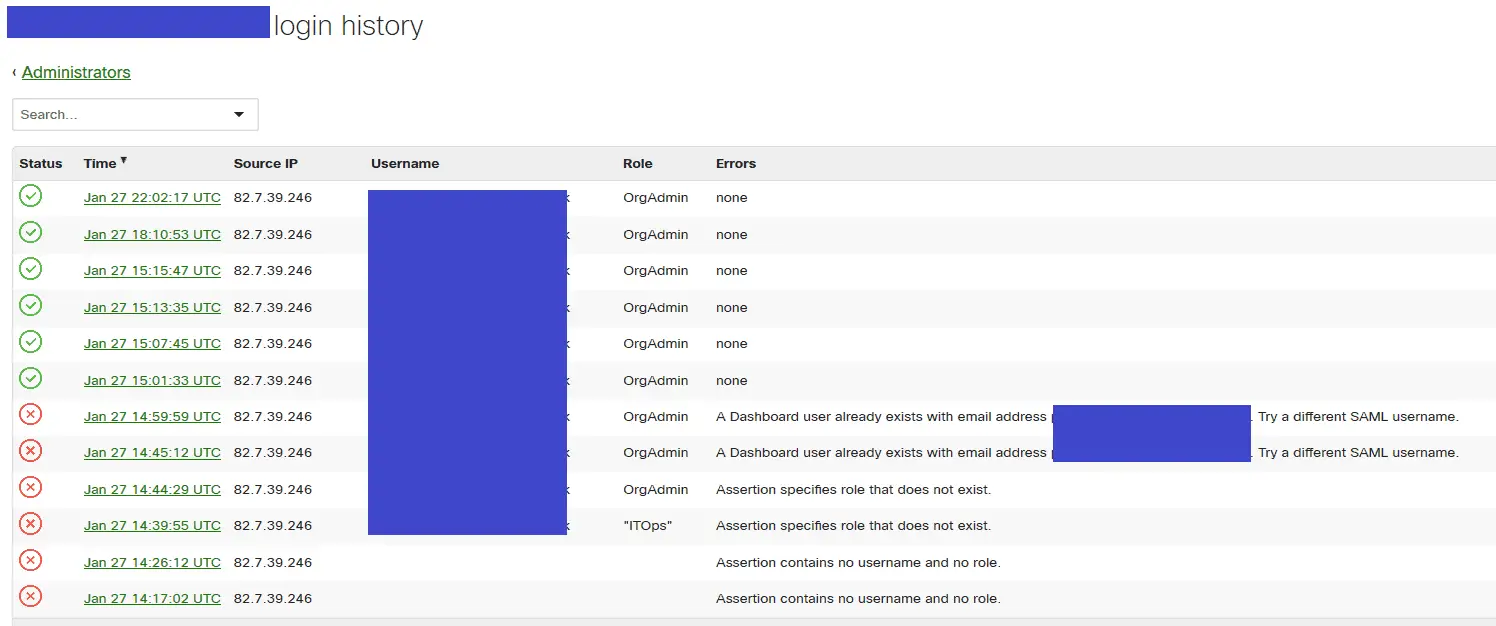
- Within the Meraki dashboard navigate to the Organisation => Configuration => Administrators section
- Click SAML sign on history. Here you will find detailed information on any failures. This link should help decode them https://documentation.meraki.com/zGeneral_Administration/Managing_Dashboard_Access/SAML_Login_History_Events
Notes
- If the user signing in already has a Meraki admin account the signin will fail. You will need to delete the Meraki admin account first.
- The Meraki dashboard doesn’t currently support
Identity Provider (IdP) initiated sign-in. You will not be able to sign in directly from the Mearki dashboard, you will need to sign-in via https://myapps.microsoft.com/ or your Office 365 portal or you can find a direct URL for the app on the Manage => Properties section on the Azure application in the “User access URL” field.

Thank you so much for providing this tutorial. It worked flawlessly for me.
Nice it works.
Is there a way to have users accessing some defined SSID using Azure AD ? Can you please explain how to have it done ?
Great article! So if I understand correctly, I could use this approach to let my user’s to authenticate for VPN connection and Corp. WIFI using their Azure AD credentials?
Great tutorial! Worked Perfectly!
Excellent! Thank you kindly.
Inorder to have more than one role, do we need to follow something like this (is this possible?):
https://docs.microsoft.com/en-us/azure/active-directory/develop/active-directory-enterprise-app-role-management
This is exactly what you will need to do, it works great. If you need further help getting it configured I can provide the json data.
I keep getting this error following your guide:
Status: Failed
Time: Aug 20 03:25:53 UTC (Aug 19 20:25:53 PDT)
Username: not specified
Role: Administrator
Errors: Assertion contains no username.
Assertion: Full XML
Hi,
I would start by checking your claims and attributes in Azure AD.
See the above screenshot, you should have a username claim
Thanks
Phil
Would you possibly show me a sanitized version of what you need to load into Graph to create a few different groups of users for this? Your guide worked perfectly to get the SAML set up to sign in, but I can’t figure out how to get groups to work… I tried to follow https://docs.microsoft.com/en-us/azure/active-directory/develop/active-directory-enterprise-app-role-management but I’m honestly in over my head
Thanks 🙂